
NB – I meant to post this one before Christmas but we were visiting my parents and their router was on the fritz so internet was lacking. Make it for New Years, or somebody’s birthday – It’s completely fabulous.
Okay, so we also always have pavlova at christmas – come on, we’re not throwing all the traditions out the window. For ages it was me who made the pav but then I taught Andy to do it and generally he insists on doing it now. In fact, he made this, I’m just transcribing it. This recipe is a wonderful riff on the classic pavlova (or, according to Jane Grigson, the pavlova is a riff on this), something different to do if you’re getting a little bored with the same old thing but still want something pavlova-y.
For some reason people have this idea that pavlovas are expert level difficult – everybody has some great aunt who is the beneficent bestower of the pav and is said to have some great secret to her success that must be passed on to the person in the next generation (or, more usually, it skips a generation) with a little prowess with the wooden spoon – the truth is, it’s just not that bloomin’ hard guys. When I said I taught Andy to do it, what I mean is that on some dreadfully hot Christmas in Perth, after we’d eaten too much food and were lazing around snoozing it off, Andy asked me for about the millionth time to teach him to make a pav and I said, “Okay. Go and find Stephanie Alexander’s recipe from The Cook’s Companion, read it, and follow the directions.” Seriously, it’s that easy.
Having said that, here are a few tips to ease the way:
- The bowl and the whisk/beaters need to be squeaky clean. Not a skerrick of grease. If you’re feeling unsure about it rub a cut lemon around the bowl and over the beaters then wipe off any excess with a bit of kitchen paper.
- I understand that in some universe it is possible to over-beat egg whites but I have never managed to do it myself. Do not be timid with the beating.
- Don’t overly stress about the exact moment of soft peaks either, what you really need to know is that once the sugar has gone in it needs to beaten until it will hold stiff peaks (when you pull the beaters out the meringue will pull up into points that stay up) – you need to be able to hold the bowl over your head without the meringue going anywhere.
- Remember if you have a fan-forced over to knock 10-15 degrees off the cooking temperatures.
- A classic meringue will crack, that’s one of its features – you haven’t done anything wrong if it cracks.
- Meringue is one of those things where if you JUST FOLLOW THE RECIPE you can’t really fuck it up, so if you’ve never done it before just follow the recipe, no subbing things in and out.
Having said all that, we’re not making a classic meringue, we’re making an absolutely fantastic recipe from Jane Grigson’s Fruit Book. I could not recommend a cook book more highly, it’s a cookbook cum encyclopaedia of fruit – the recipes are fantastic and she is an entertainingly wry writer and historian, I can recommend all of her books. This recipe is in the Raspberries section.
Hazelnut and Raspberry Meringue Cake
Ingredients
125g hazelnuts
5 large egg whites
300g vanilla caster sugar*
½ tsp white wine vinegar
300g cream
250g raspberries (or whatever berries you particularly like)
Icing sugar
Method
Preheat the oven to 150°. Put the nuts on a baking tray and whack them in the oven for about 10 minutes, or until pale brown. Allow to cool. Blitz the nuts in food processor or nut/spice grinder until you have a coarse powder – we’re just making a little bit of hazelnut meal, you could sub in pre-ground meal if you can find it, but it won’t be as toasty.
Turn the oven up to 180°. Line two 20-23 cm round cake tins with baking paper. Grease the tins so the paper will stick, but there’s no need to grease the cake facing side of the paper.
Beat the egg whites until stiff, then, still whisking, add the sugar a little at a time. Once the egg whites are glossy and stiff enough to hold the bowl over your head (see notes above), whisk in the vinegar. Using a spatula or a big metal spoon, carefully fold the nuts into the meringue.
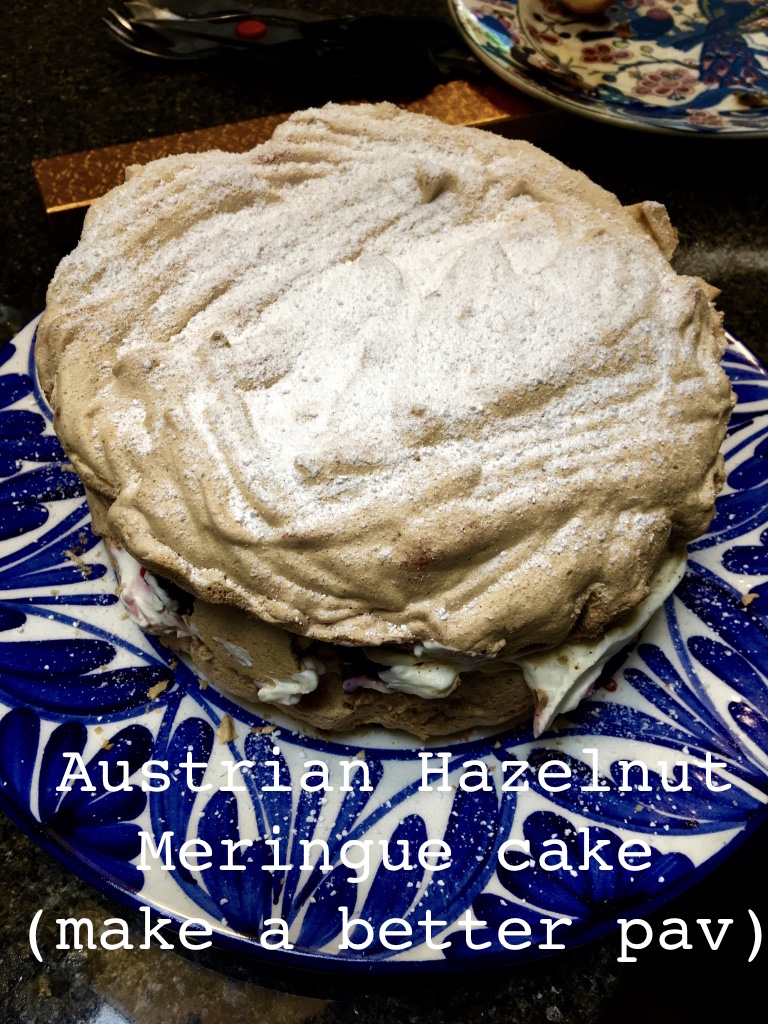
Spread the mixture evenly between the cake tins, flattening the tops out with a spatula and patterning one of them with a fork, so you get a nice swirly effect – an offset metal spatula would be a great help here if you happen to have one. Bake for 35 minutes then turn the oven off and let them cool inside the oven – the slow cooling you get with this is supposed to limit cracking, I’m not sure if it’s strictly necessary for this, it’s just what I always do with a pavlova.
When the meringues are cool and you are ready to eat, gently take them out of the cake tins and gently peel the paper off – a bit of the bottom of the meringue might stick to the paper and peel away exposing the inside which will be a big air bubble, don’t worry about it, this bit is the inside of the cake and will get filled up with cream and fruit. Put the non-fork-whirled meringue upside down on a serving plate. Whip the cream, only until it’s full and thick enough to just hold its shape – no over-whipped, cream in a can impressions please – it should be unctuous. Either fold in the berries, or slather the cream on the meringue and put the berries on top, whichever you prefer. Place the other meringue on top and sift some icing sugar over the top.
You probably need a little glass of prosecco or muscut to go with this. It is a celebration after all.
_____________________________
*Vanilla caster sugar is just caster sugar that has a vanilla bean sitting in the jar. If you don’t have it, put a little vanilla bean paste or good vanilla essence in at the same time as the vinegar. I’d mix it with the vinegar in a little cup or something for even distribution. You could leave it out all together too.